Xue Yunfeng, a writer, is mainly engaged in the research of video image algorithms. He is a researcher in deep learning algorithms at Zhejiang Jieshang Vision Technology Co., Ltd.
I believe that many of my friends have used Caffe's deep learning framework for a long time, and I also hope to understand Caffe's implementation from the code level to customize the new features. This article will analyze the Caffe source from the perspective of the overall architecture and the underlying implementation.
1.Caffe overall architectureThe Caffe framework has five main components, Blob, Solver, Net, Layer, Proto, and its structure is shown in Figure 1. Solver is responsible for the training of deep networks. Each Solver contains a training network object and a test network object. Each network consists of several layers. Each Layer's input and output Feature maps are represented as Input Blobs and Output Blobs. Blob is the structure of Caffe's actual stored data. It is a matrix of indefinite dimensions. It is generally used to represent a straightened four-dimensional matrix in Caffe. The four dimensions correspond to the Batch Size(N) and the number of channels of the Feature Map (C). Feature Map height (H) and width (W). Proto is based on Google's Protobuf open source project. It is an XML-like data exchange format. Users only need to define the data members of the object according to the format. It can implement serialization and deserialization of objects in multiple languages. It is used in Caffe. Structure definition, storage, and reading of network models
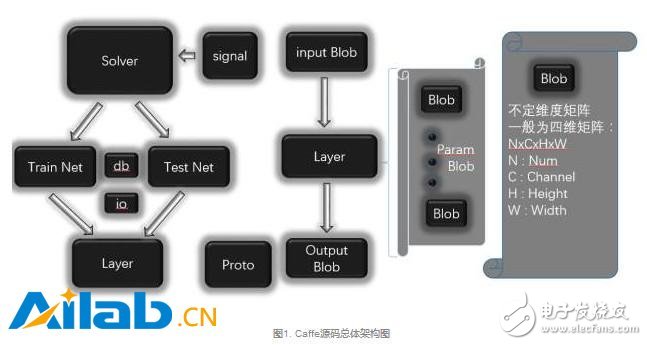
The basic data storage class blob in Caffe is described below. Blob uses the SynchedMemory class for data storage. The data member data_ points to the memory or memory block that actually stores the data. The shape_ stores the dimension information of the current blob, and the diff_ holds the gradient information when the reverse is passed. In the Blob, there is actually only a four-dimensional form of num, channel, height, and width. It is a data structure of indefinite dimensions, and the data is expanded and stored, and the dimensions are separately stored in a shape_variable of the vector type, so that each dimension is Can be changed at will.
Let's take a look at the key functions of Blob. The data_at function can read the data stored in this class. diff_at can be used to read the error sent back. By the way, give a hint, try to use data_at (const vector & index) to find the data. The Reshape function can modify the storage size of the blob, and count is used to return the amount of stored data. The BlobProto class is responsible for packetizing and serializing Blob data into Caffe's model.
3. Factory mode descriptionNext, we introduce a design pattern Factory Pattern. The Solver and Layer objects in Caffe are created using this pattern. First, look at the UML class diagram in factory mode:
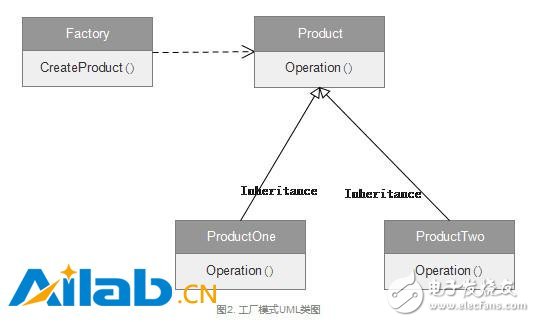
Just as the Factory generates the same function but different models, these products implement the same OperaTIon. Many people read the code of the factory mode, which will cause such a question why not come out, so it seems that there is no problem with the new one. Imagine the following situation, because the name of the code refactoring class has changed, or the constructor parameters have changed (increasing or decreasing parameters). And there are N new classes in your code. If you don't use the factory again, you can only find one by one. The role of the factory model is to reduce the user's understanding of the product itself and reduce the difficulty of use. If you use a factory, you only need to modify the implementation of the concrete object method of the factory class, and other code will not be affected.
For example, write code should not be hungry to work overtime to eat supper, McDonald's chicken wings and KFC's chicken wings are MM love to eat, although the taste is different, but whether you bring MM to McDonald's or KFC, just tell the waiter "Take four chicken wings" will do. McDonald's and KFC are factories that produce chicken wings.
4.Solver analysisNext, let's get back to the topic, let's see how Solver is optimized in Caffe. The SolverRegistry class is the factory class we saw above. It is responsible for giving us a product that optimizes the algorithm. The external only needs to define the data and network structure, and it can optimize itself.
Solver* CreateSolver(const SolverParameter& param) is the operation of CreateProduct in factory mode. The SolverRegistry factory class in Caffe can provide us with 6 products (optimization algorithm):

The functions of these six products are to implement the parameter update of the network, but the implementation is different. Then let's take a look at their use process. Of course, these products are similar to the OperaTIon in the Product class above. Each Solver inherits the Solve and Step functions. The only thing that is unique in each Solver is that the function in the ApplyUpdate function is different, the interface is the same, and this is also with us. The products produced by the factory mentioned before have the same function and different details. For example, most rice cookers have the function of cooking rice, but each type of rice cooker can be heated differently, and the chassis is heated by stereo heating. Wait. Next, let's take a look at the key functions in Solver.
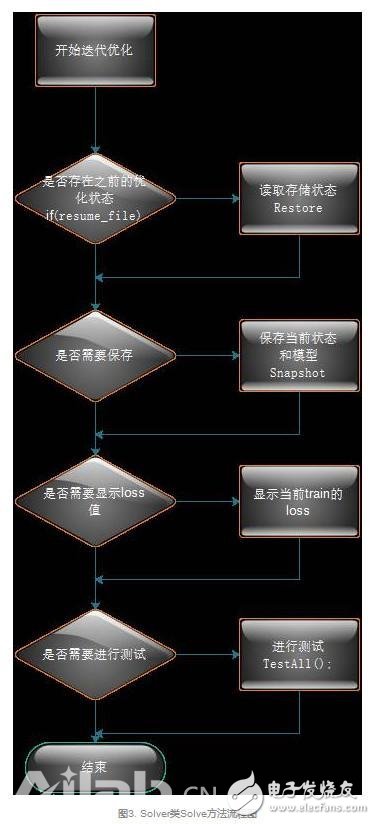
The flow chart of the Solve function in Solver is as follows:
Step function flow chart in the Solver class:
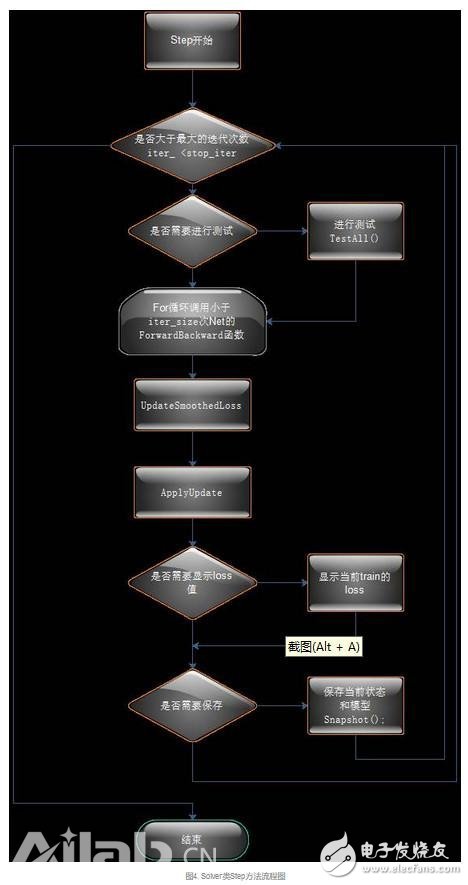
The key to Solver is the process of calling the Sovle function and the Step function. You only need to compare the implementation of the two functions in the Solver class. You can understand the process of Caffe training execution by understanding the above two flowcharts.
5.Net class analysisAfter analyzing Solver, we will analyze some key operations of the Net class. This is the deep network object we created with Proto, which is responsible for the forward and reverse delivery of deep networks. The following is the NeTInit function call flow for the initialization method of the Net class:
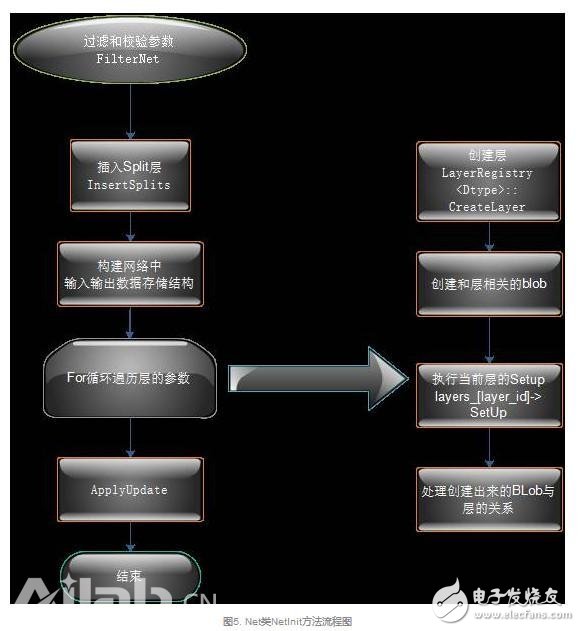
A simple analysis of the key functions in Net's class:
1.ForwardBackward : Forward and Backward are called in order.
2.ForwardFromTo(int start, int end) : Performs forward transfer from the start layer to the end layer, using a simple for loop call.
3. BackwardFromTo(int start, int end) : Similar to the previous ForwardFromTo function, calling the reverse pass from the start layer to the end layer.
4. The ToProto function completes the serialization of the network to the file, and loops through the ToProto function of each layer.
6.Layer analysisLayer is the basic building block of Net, such as a convolution layer or a Pooling layer. This section describes the implementation of the Layer class.
(1) Layer's inheritance structure
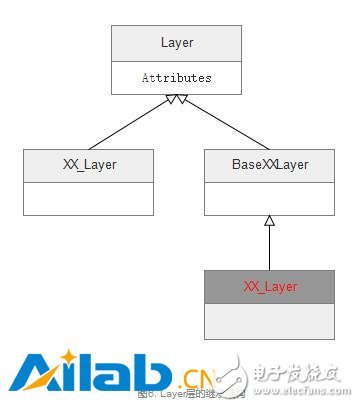
(2) Layer creation
Much like Solver's creation, Layer's creation is also in factory mode. Here are a few macro functions:
REGISTER_LAYER_CREATOR is responsible for putting the function that creates the layer into the LayerRegistry.

Let's take a look at the generated macro REGISTER_LAYER_CLASS of the function created by most layers. You can see that the macro function is relatively simple, and the type is used as part of the function name, so that you can create a create function and put the create function into the LayerRegistry.

REGISTER_LAYER_CREATOR(type, Creator_##type##Layer)
This code is in the split_layer.cpp file
REGISTER_LAYER_CLASS(Split).
So we will replace the type and give you an example, refer to the code below.
Of course, the creation function here seems to be a direct call, and there are some problems related to our previous factory pattern. Is this the class of all layers? Of course not, let's take a closer look at the convolution class.
How does the convolution layer create a function? Of course, the creation function of the convolution layer is in LayerFactory.cpp. The screenshot is for everyone to see. The specific code is as follows:

Both of these types of Layer's creation functions have corresponding declarations. Here is a direct description of the layer in addition to the cudnn implementation, the other layers are created in the first way, and the layer with cudnn implementation is the second way to create the function.
(3) Layer initialization
After the introduction, let's see how several functions in the layer are called.
Key Function Setup This function is called when NeTInit in the previous flowchart. The code is as follows:
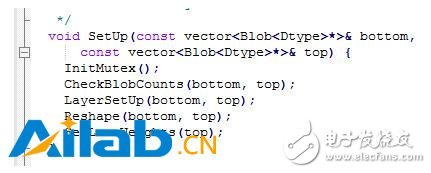
In this way, the entire Layer initialization process, CheckBlobCounts is called first, then LayerSetUp, followed by Reshape, and finally SetLossWeights. In this way, the life cycle of the Layer initialization is known to everyone.
(4) Introduction of other functions of Layer
Layer's Forward and Backward functions complete the forward and reverse transfer of the network. These two functions must be implemented in their own implementation of the new layer. Among them, Backward will modify the diff_ of the blob in the bottom, thus completing the direction of error.
7.Protobuf introductionThe Caffe.proto file in Caffe is responsible for the construction of the entire Caffe network, and is responsible for the storage and reading of Caffemodel. An example of how Protobuf works is described below.
Use the protobuffer tool to store 512-dimensional image features:
1.message preparation: create a new txt file with the suffix name changed to proto, write your own message as follows, and put it into the unpacked protobuff folder;
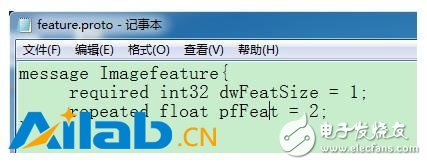
Where dwFaceFeatSize represents the number of feature points; pfFaceFeat represents the face feature.
2. Open the windows command window (cmd.exe)---->cd space, copy and paste the file path of the protobuff into the ------>enter;
3. Enter the command protoc *.proto --cpp_out=. --------->enter
4. You can see that the files "*.pb.h" and "*.pb.cpp" are generated in the folder, indicating that it is successful.
5. The following can be integrated with your own code:
(1) Create your own project, add "*.pb.h" and "*.pb.cpp" files to your project and write #include" *.pb.h"
(2) According to the tutorial of the distribution library, you can configure the library.
Protobuf's library method under VS:
Solution---->Right-click on the project name---->Attribute
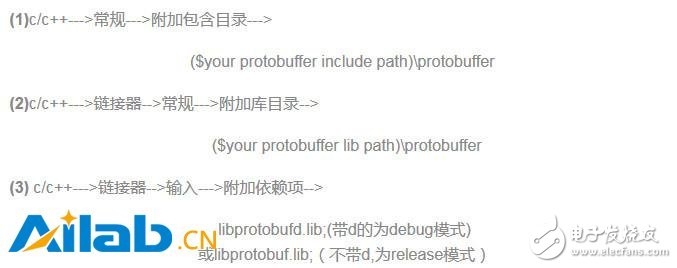
The method of packaging using protobuf is as follows:
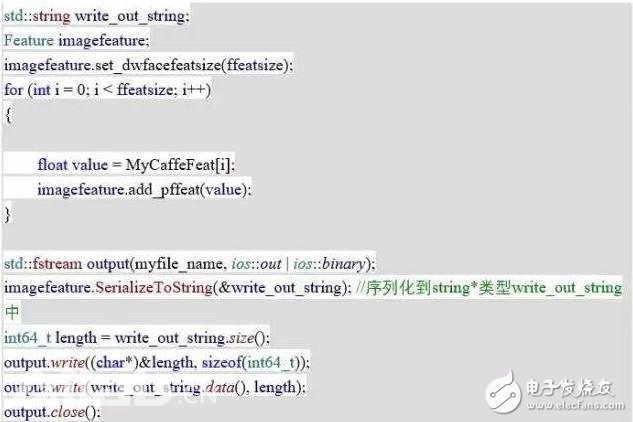
(1) Caffe's model serialization
BlobProto is actually a class that Blob is serialized into Proto. The Caffe model file uses this class. Net calls the Toproto method of each layer. The Toproto method of each layer calls the ToProto method of the Blob class, so that the complete model is serialized into the proto. Finally, the model is written to the file by serializing the object that the proto inherits from the message class into a file. When Caffe packages the model, it simply calls the WriteProtoToBinaryFile function, and the contents of this function are as follows:
So far, Caffe's serialization model has been completed.
(2) A brief description of Proto.txt
The construction of the Caffe network and the parameter definition of Solver are done by this type file. ReadProtoFromTextFile is called during the Net build process to read all network parameters. Then call the above process to build the entire caffe network. This file determines how to use each blob in the caffe model. If there is no such file caffe, the model file will not be available because only a variety of blob data is stored in the model. The float value, and how to split the data is determined by the prototxt file.
Caffe's architecture uses a reflection mechanism to dynamically create layers to build Net. Protobuf essentially defines graph. The reflection mechanism is formed by the macro with the map structure, and then uses the factory pattern to create various layers. Of course, the difference between the general definition configuration uses xml or json, the project's writing uses the proto file to assemble the components.
to sum up
The above is a general introduction to the Caffe code architecture, hoping to help the small partners find the key to open the custom Caffe door. The author of this article hopes to use this to learn more about peer-to-peer communication with Caffe and the underlying implementation of the deep learning framework.
USB4 specifies tunneling of:
USB 3.2 ("Enhanced Superspeed") Tunneling
DisplayPort 1.4a -based Tunneling
PCI Express (PCIe)-based Tunneling
Main Benefits of USB 4
The new USB 4 standard has three main benefits over prior versions of USB.
40 Gbps Maximum Speed: By using two-lane cables, devices are able to operate at up to 40 Gbps, the same speed as Thunderbolt 3. The data is transmitted in two sets of four bidirectional lanes.
DisplayPort Alt Mode 2.0: USB 4 supports DisplayPort 2.0 over its alternative mode. DisplayPort 2.0 can support 8K resolution at 60 Hz with HDR10 color. DisplayPort 2.0 can use up to 80 Gbps, which is double the amount available to USB data, because it sends all the data in one direction (to the monitor) and can thus use all eight data lanes at once.
Better Resource Allocation for Video, PCIe: In lieu of alternative mode where the other interface takes over the connection, USB 4 devices can use a process called "protocol tunneling" that sends DisplayPort, PCIe and USB packets at the same time while allocating bandwidth accordingly.
Usb4 Cable,Usb To Usb4,Usb 4 Cable,Usb 4 Wires
UCOAX , https://www.jsucoax.com