When designing PPT, we often insert various novelty graphics to enhance PPT's beauty and expressiveness. However, many friends do not know where to look for these graphic materials. In fact, PPT itself already has a wealth of graphic resources. We can make your PPT more glorious by just adding a little hand!
Shape + Color Block, Use Shape Label Text
In PPT, there are often some more important contents that need to be highlighted. The conventional method is to use different color fonts for labeling, but this effect is more abrupt. If you want to highlight the important content of the text, you can now use the "shape + color" annotation method.
Click "Insert → Shape", and then insert a right-sized rectangle on the text to be marked, select the inserted rectangle, switch to "Drawing Tools → Format → Shape Outline → None", continue to switch to "shape fill → select the appropriate Fill color." Finally, select the inserted rectangle and right-click to select "Place in the bottom → Placed in the bottom" and place it at the bottom. Is it better to use a color-filled content to highlight this effect (Figure 1)?
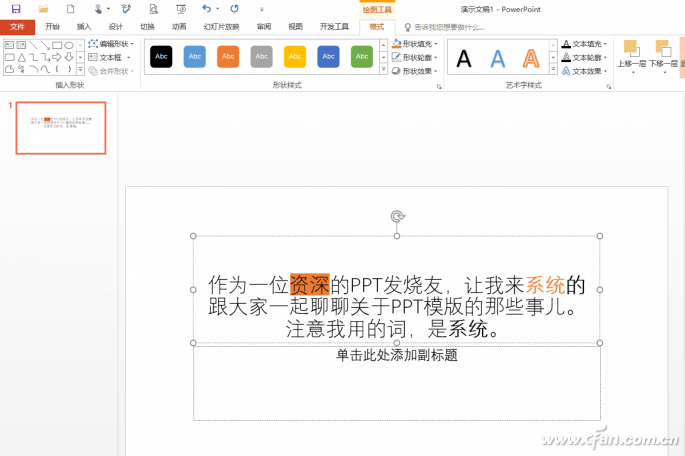
Figure 1 Using "shape + color" to highlight the key
Shape + combination, make special shape decoration content
In PPT design, many times in order to allow viewers to refresh, we often need to insert some composite graphics in the slide. For example, when the author was producing a traditional Chinese cultural PPT, in order to highlight tradition, there is a need to insert a Tai Chi icon representing traditional Chinese culture. This icon seems to be complicated, in fact, as long as you use the PPT's shape combination function.
Click "Insert → Shape → Ellipse", and then hold down the Shift key with the left hand, drag the mouse to draw a positive circle, right click the positive circle to select "size and position", set its height and width to 12cm. As above continue to insert a small circle 2 (height and width are set to 6cm, the color fill is white) in the large circle, hold down the Ctrl key to copy a small circle 2 to a small circle 3, and then cut them inward as shown below Arranged in a great circle (Figure 2).
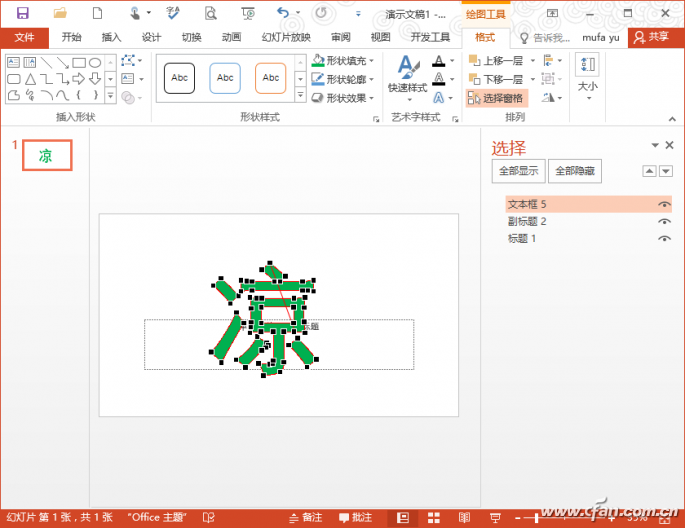
Figure 2 Three circular arrangements
Select the black large circle 1, hold down the Ctrl key and select the two small circles, and click "Format → Merge Shape → Cut" to form a polygon. A rectangle is inserted in the same manner as above, so that the inserted rectangle can block the right side of the large circle, that is, the position of the center of the three circles is on the left line of the rectangle. Hold down the Ctrl key and click on the left side of the polygon and click on the rectangle. Click Format -> Merge Shape -> Cut Off. The content on the right of the polygon (ie, the combination circle) is deleted (Figure 3).
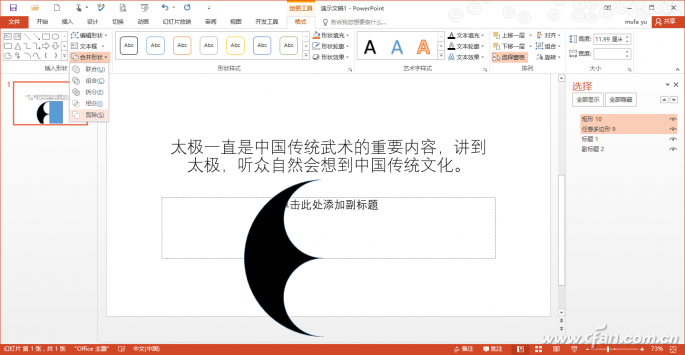
Figure 3 delete the right side of the content
Continue to insert a circle 4 with a size of 6cm in the upper area of ​​the polygon, fill in black and move to a semicircle position, select the polygon and circle 4, click “Format → Group → Groupâ€, this will complete the setting of the left half of Tai Chi . Hold down the Ctrl key to make a copy, rotate it 180 degrees, fill in white and combine with the left half of the Tai Chi to complete the setup of a complex Tai Chi pattern (Figure 4).
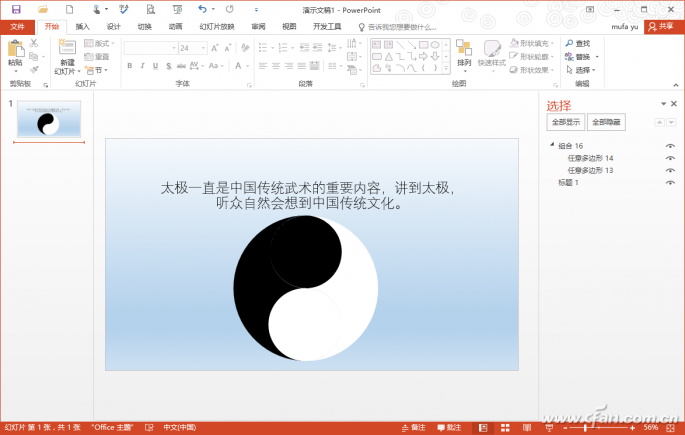
Figure 4 Complete Tai Chi Pattern Settings
We can see that through the "Boolean operation" of shapes, we can obtain different combinations of special graphics. In the same way, we can use to create more special effects components. For example, in the production of PPT, it is often necessary to use some deformed words to express the theme of the slide, and the deformed character can also be created by means of “shape + fontâ€.
In the slide above, click "Insert → Text Box", insert a font that needs to be distorted, such as "Cool", switch to "Start → Font", set the font size to "96", bold font. Continue to insert a rectangle of the same size and font type. The fill color is set to be the same as the font color without outlines (Figure 5).
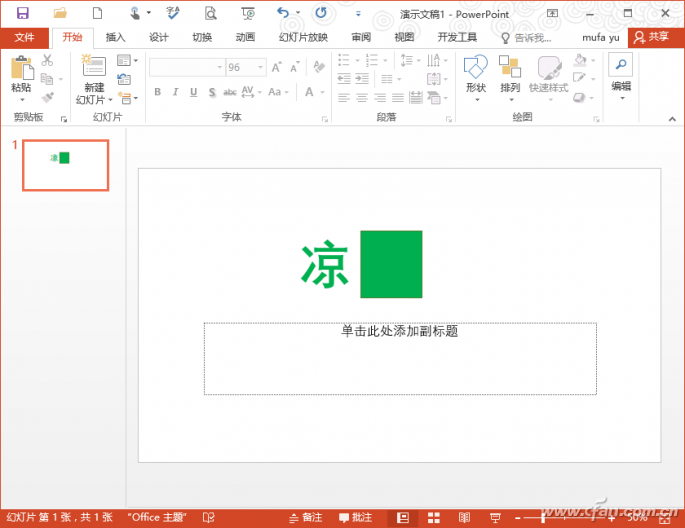
Figure 5 Insert text and rectangles
Overwrite the rectangle with the text, select the text and rectangle, and click Format → Merge Shape → Intersect. This will change the shape to shape. Right-click on the shape and select "Edit Vertex". You can see that the text can now be dragged to perform arbitrary deformations. The effect is like vector text (Figure 6).
Figure 6 Text can edit vertices
For example, the theme of PPT is to highlight "cool", so you can create exaggerated deformations on the stretch of its side to highlight the theme of PPT, of course, you can also perform more arbitrary deformation operations according to your needs (Figure 7).

Figure 7 Editing vertex transformations
Shape + Union, Make Picture Mask
In the design of PPT image materials, in order to highlight the characters on the pictures, we often use the mask method to blur other minor elements to highlight the image characters. Many friends use PS and other professional tools to add mask effects. In fact, with the help of “shapeâ€, mask effects can be produced. For example, the following figure should be used to highlight the effect of the right beauty image (Figure 8).

Figure 8 mask effect example
Insert the original image in PPT, click "Insert → Shape → Rectangle", insert a rectangle of a suitable size, and adjust the right edge of the rectangle to the frontal angle of the beauty head. Click "Insert → Shape → Arbitrary Polygon" to set the area of ​​the polygon as the area between the beauty picture and the rectangle. Since the polygon cannot accurately outline the face area, you can right-click to select the “Edit Vertex†polygon and drag the mouse to fit the vertex edit and face areas of the polygon (Figure 9).
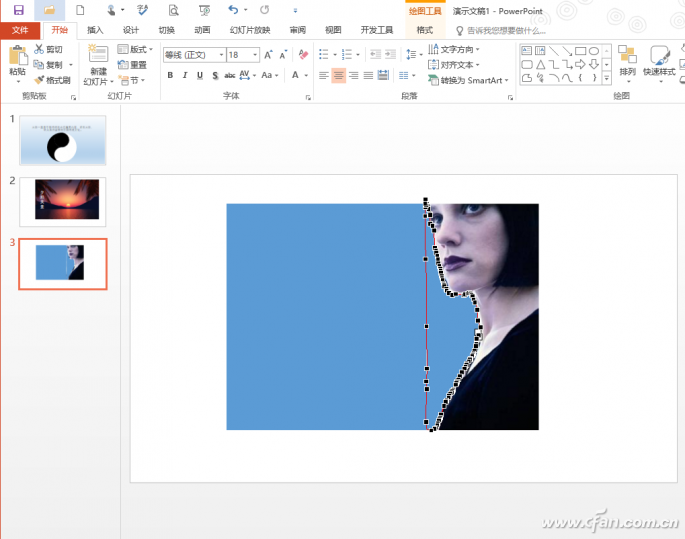
Figure 9 Editing vertices
Select the inserted rectangle and polygon, and click "Format → Shape → Union" to join the two inserted graphics. Select the union graphic, set its outline to none, fill the setting to "gradient color", direction "to the right", and set the transparency to 0 so that you can get a mask effect in a similar example (Figure 10). Of course, we can also get more processing effects by filling in other colors (such as filling the white and retaining only beautiful pictures).
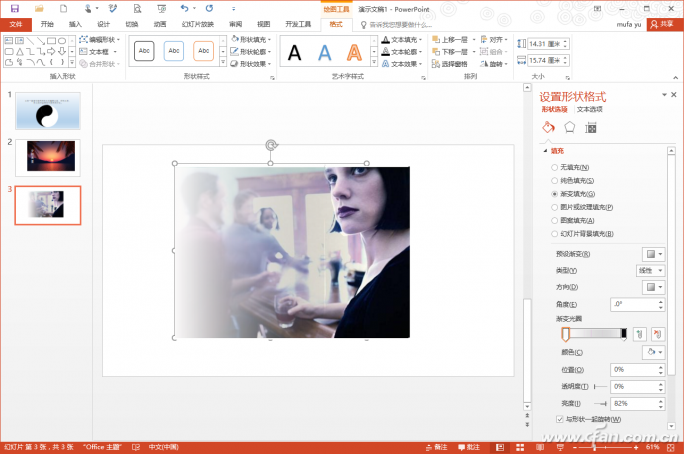
Figure 10 mask effect
Multi Plug DC EV charger
Shenzhen Hongjiali New Energy Co., Ltd. , https://www.hjlcharger.com