introduction
This paper designs a living room game host based on TI's OMAP3515 open source platform. The open source software platform uses Linux system, independently transplants the more popular and friendly interface Android system, develops the platform software SDK, develops hopoplayer player, supports Flash. The format of the game, and the establishment of a friendly porting framework, can be easily ported to other platforms, the host uses the somatosensory handle to control the display interface and control the somatosensory game. The complete family somatosensory entertainment platform is shown in Figure 1.

Figure 1 Family somatosensory entertainment platform
1 living room game console
The living room game console is based on TI's OMAP3515 open source platform design. Software, you can choose Android system, you can also choose Linux system. The Android system is also based on the open source Linux system kernel, so the design of the network card driver, HDMI driver, audio driver, display driver, NAND Flash driver, USB driver principle is the same. On the hardware, the network card chip, power management chip, audio decoding chip, USB chip and NAND Flash chip were replaced, and the HDMI driver chip was added.
Linux system and Android system use the same bootloader xloader, uboot, design different kernel and file system, modify different boot parameters to choose Linux system or Android system.
There are two ways to transplant Android system to embedded Linux platform equipment: one is to use Android patch in the kernel used, the patch quantity is relatively large, the chance of error is large, the transplantation time will be very long; the other is Using the open source Android system, the platform driver and configuration are patched and added to the Android system. This article uses this method.
1.1 Download Android source code and build the build environment
Host System: Linux Fedora 10.
(1) Download Android source code
$ yum install git?core
$ curl http://android.git.kernel.org/repo 》~/bin/repo
$ chmod a+x ~/bin/repo
$ mkdir rowboat?android
$ cd rowboat?android
$ repo init ?u git://gitorious.org/rowboat/manifest.git ?m rowboat?donut.xml
$ repo sync
(2) Establish a compilation environment
1 Prepare the required development kit:
Git 1.5.4 or newer and the GNU Privacy Guard.
JDK 5.0, update 12 or higher. Java 6 is not supported, because of incompaTIbiliTIes with @Override.
Flex, bison, gperf, libsdl?dev, libesd0?dev, libwxgtk2.6?dev (optional), build?essential, zip, curl, minicom, tftp?server, uboot?mkimage
2 For Fedora 10 use the following command:
$ yum install bison gperf flex xorg?x11?proto?devel readline?devel
Download jdk?1_5_0_22?linux?i586.bin, installed under /usr/local/hualu/android/rowboat?android/jdk1.5.0_22.

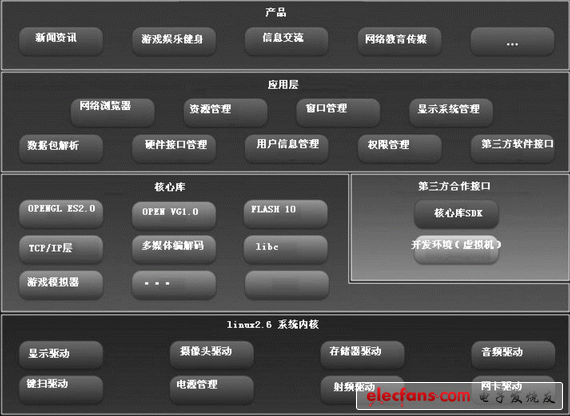
Figure 2 host frame
Modify the java environment variable:
Export JAVA_HOME=/usr/local/hualu/android/rowboat?android/jdk1.5.0_22
Export PATH=$JAVA_HOME/bin:$PATH
Export CLASSPATH=$JAVA_HOME/lib/tools.jar:$JAVA_HOME/lib/dt.jar:$CLASSPATH
For Ubuntu 32?bit use such command:
$ sudo apt?get install git?core gnupg sun?java5?jdk flex bison gperf libsdl?dev libesd0?dev libwxgtk2.6?dev build?essential zip curl libncurses5?dev zlib1g?dev minicom tftpd uboot?mkimage
Ubuntu Intrepid (8.10) users may need a newer version of libreadline:
$ sudo apt?get install lib32readline5?dev
Download jdk?1_5_0_22?linux?i586.bin, installed under /usr/local/hualu/android/rowboat?android/jdk1.5.0_22.
Modify the java environment variable:
Export JAVA_HOME=/usr/local/hualu/android/rowboat?android/jdk1.5.0_22
Export PATH=$JAVA_HOME/bin:$PATH
Export CLASSPATH=$JAVA_HOME/ lib/tools.jar:$JAVA_HOME/lib/dt.jar:$CLASSPATH
3 Create rootfs:
$ make TARGET_PRODUCT=omap3?evm TARGET_BUILD_VARIANT=tests ?j8
$ cd out/target/product/omap3evm
$ mkdir android_rootfs
$ cp ?r root/* android_rootfs
$ cp ?r system android_rootfs
$ sudo ////build/tools/mktarball.sh ///host/linux?x86/bin/fs_get_stats android_rootfs . Rootfs rootfs.tar.bz2
4 Create a kernel:
$make ARCH=arm omap3_evm_android_defconfig
1.2 The main process of porting Android system
1 First go to the http://code.google.com/p/rowboat/wiki/Source website and refer to the instructions to download the 2.6.29 kernel and omap3evm?donut?2009?12?22.tar.bz2 file system.
If you only download the TI OMAP3EVM kernel, you can use git clone git://gitorious.org/rowboat/kernel.git.
2 Modify the boot parameters of uboot:
Setenv bootargs ?mem=128M console=ttyS2,115200n8 root=/dev/mmcblk0p2 rw init=/init rootwait?.
3 Patch the content modified on TI OMAP3EVM on the platform and port it to the kernel downloaded in step 1. The focus is on the driver and display part of the platform.
4 Copy the modified uImage of the kernel and the SD card of the file system to the Android system from the SD card.
5 After the startup, the robot LOGO appears first, then the “android†font LOGO appears, and finally the Android main interface appears.
6 Optimize and modify the startup interface. If you need to boot from NAND Flash, modify the corresponding startup parameters and file system.
digital menu screens, digital menu boards, digital signs for businesses, indoor digital signage
Guangdong Elieken Electronic Technology Co.,Ltd. , https://www.elieken.com